Mindfulness: Restorative Yoga at Home

Restorative yoga is different than many other types of yoga as the goal is to allow your body to be still & fully supported by the props and pillows so that your body can fully release tension. It is recommended that the body rests in these poses for 5- 10 mins or longer if desired. The longer you are able to stay in a pose, the more time your body and mind have to sink deeper into relaxation.
Improves Sleep
If you have difficulties falling asleep at night these poses are a great addition to your nightly routine as they will help to calm the mind and body before a good night’s sleep. Once in a pose, take a moment to make any adjustments to your props so that your body feels fully supported. If you are unable to find a supported position to be completely still for a period of time, then try another pose until you find a comfortable and restful state. If you would like to set a small peaceful timer to advise a change of pose, the app Insight timer is a helpful tool.
During your relaxation into the pose, you may find your mind wanders which may not help you relax comfortably. To ease your mind into a restful state, focus on recognizing the rhythm of your breath and/or find a simple mantra to repeat during your time in the pose. Additionally, you can find a yoga Nidra recording or listen to a meditation.
Infuse your Yoga Practice with a Repetitive Mantra
Using a repetitive mantra is a way that we can focus our mind with the intension of quieting our background thoughts. If you choose to recognize a mantra as well as your breathing, try to sync the repetition of the mantra along with the rhythm of your breath. Remember to be kind to yourself during the practice. If you find that your mind is wandering or becoming loud, gently bring your attention back to your mantra and/or breathing. It is recommended that you chose a mantra that reflects an intension you would like to commit to. Here are a few mantras that can increase relaxation:
With every breath, I feel myself relaxing
I am safe, I am supported, I am strong
I have control over how I feel, and I choose to feel at peace
I am present, I am focused, I am kind
I give myself permission to let go of what no longer serves me
I give love, I receive love
Yoga Equipment Adaptations
For those who do not have yoga equipment, you will need several pillows, a couple of fluffy towels, and a few blankets. I use yoga blocks in the following poses however you can substitute a few books with a small towel for blocks.
Below are some restorative poses that you can use to destress and rejuvenate.
Restorative Child’s Pose
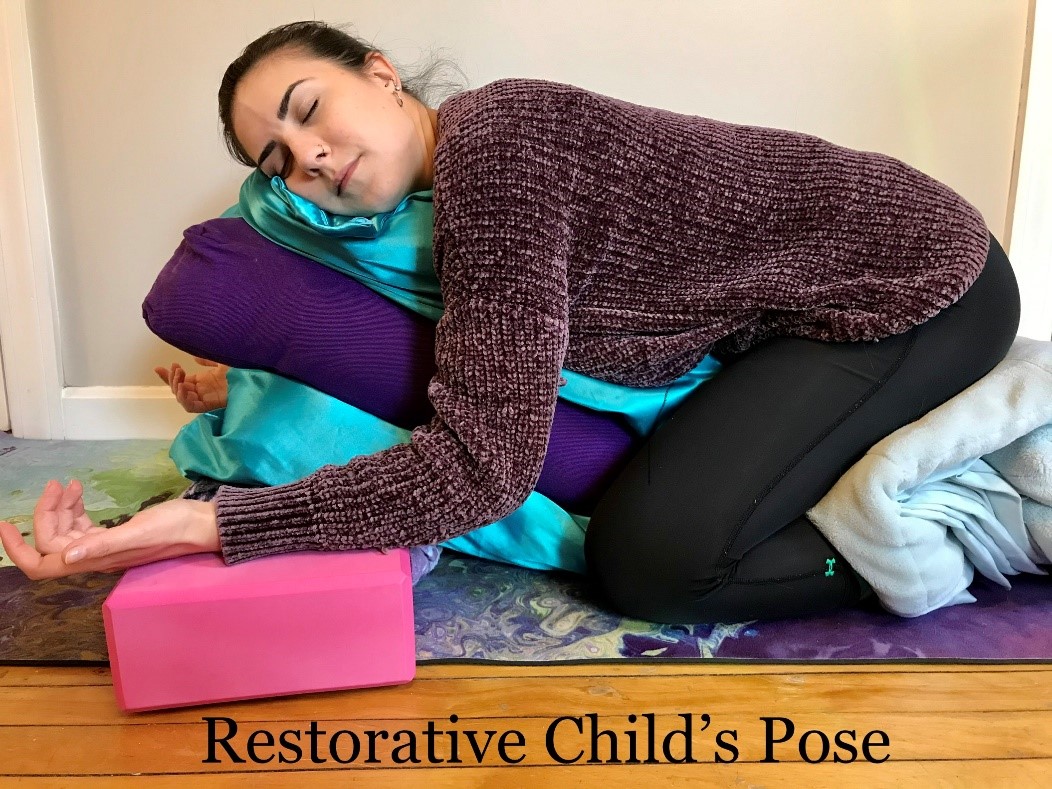
This pose is simple and is a great introduction to restorative yoga. It supports your lower back and helps to release tension in your shoulders. Start by sitting on your heels and angle your knees out beyond your hips. You can place a blanket or a pillow over your heels to raise your hips and protect your knees. If you would like more protection for your knees to place a blanket under your knees as well. Set a few towels or cushioned books on each side of a few elevated pillows. Bring the elevated pillows between your legs. Take a deep breath in and on your exhale, lay with your chest flat on the pillows. Lay on the side of your face that is most comfortable and rest your hands on the side props for maximum support.
Recommendation: set up your props and get into the first seated position. Before you take a breath to lay on your props, slowly roll your neck around to get an added release in your neck before you twist it while laying. You can change the placement of your face during the restoration time to reduce any strain on your neck.
Restorative Spinal Twist
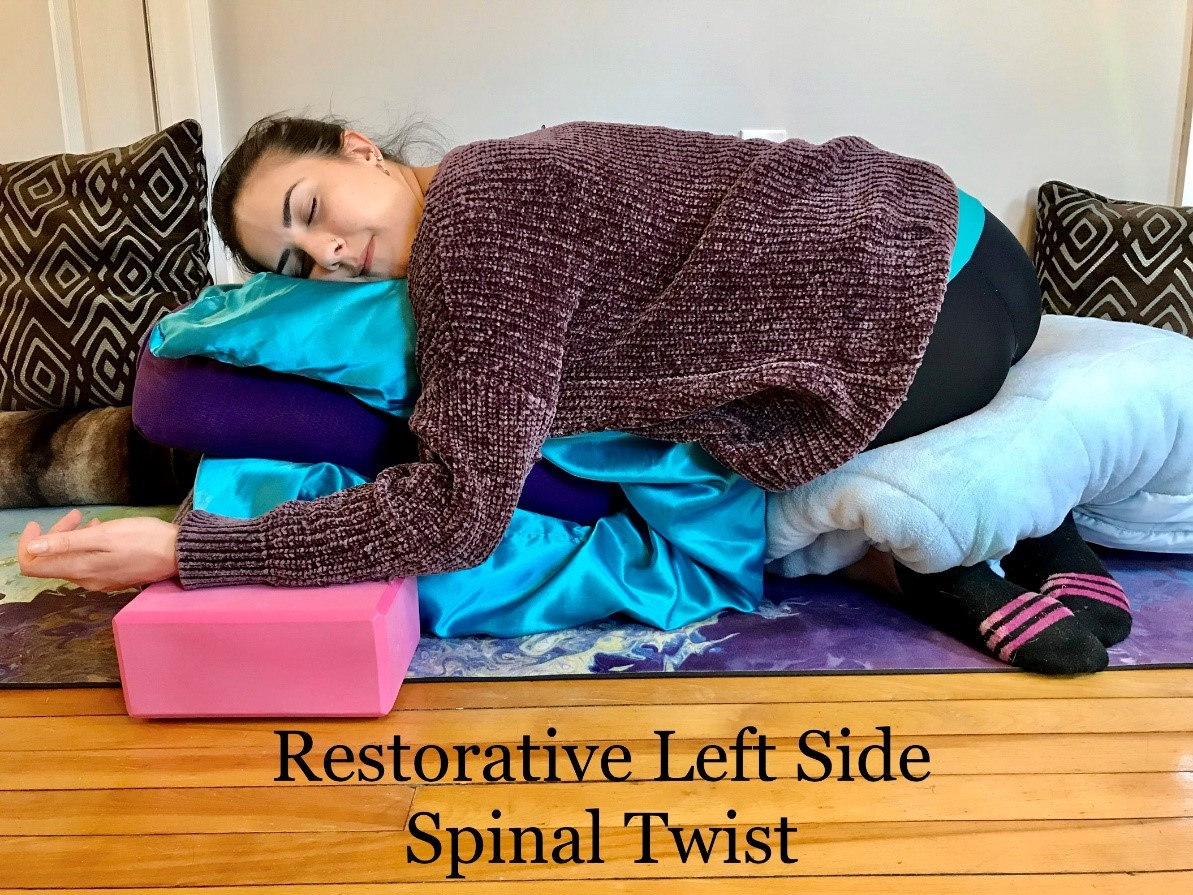
In the picture shown, I am supporting my left side spine however this pose will be the same for both your left side and your right. It is recommended that you practice both sides of a spinal twist for the same amount of time. A spinal twist can sometimes strain your back if in the pose for a long period of time, so it is recommended to practice this pose for only 5-6 minutes per side.
This pose is a perfect secondary action to follow Child’s pose as it uses the same prop set up. It supports the lower back with a small stretch and continues a relaxation in your shoulders. With the same prop set up as a child’s pose: sit on your heels and place your legs perpendicular to the elevated pillows. Place a blanket or pillow on your heels and/or under your knees for support. Snuggle the side of your hips into the bottom edge of the pillows. Take a deep breath in and as you exhale, SLOWLY turn your abdomen and then chest towards the pillows and lay down with your chest flat. Place your head facing away from your knees. Allow your hands to rest on the prop supports on each side of the pillows.
Supported Fish with Bound Angle
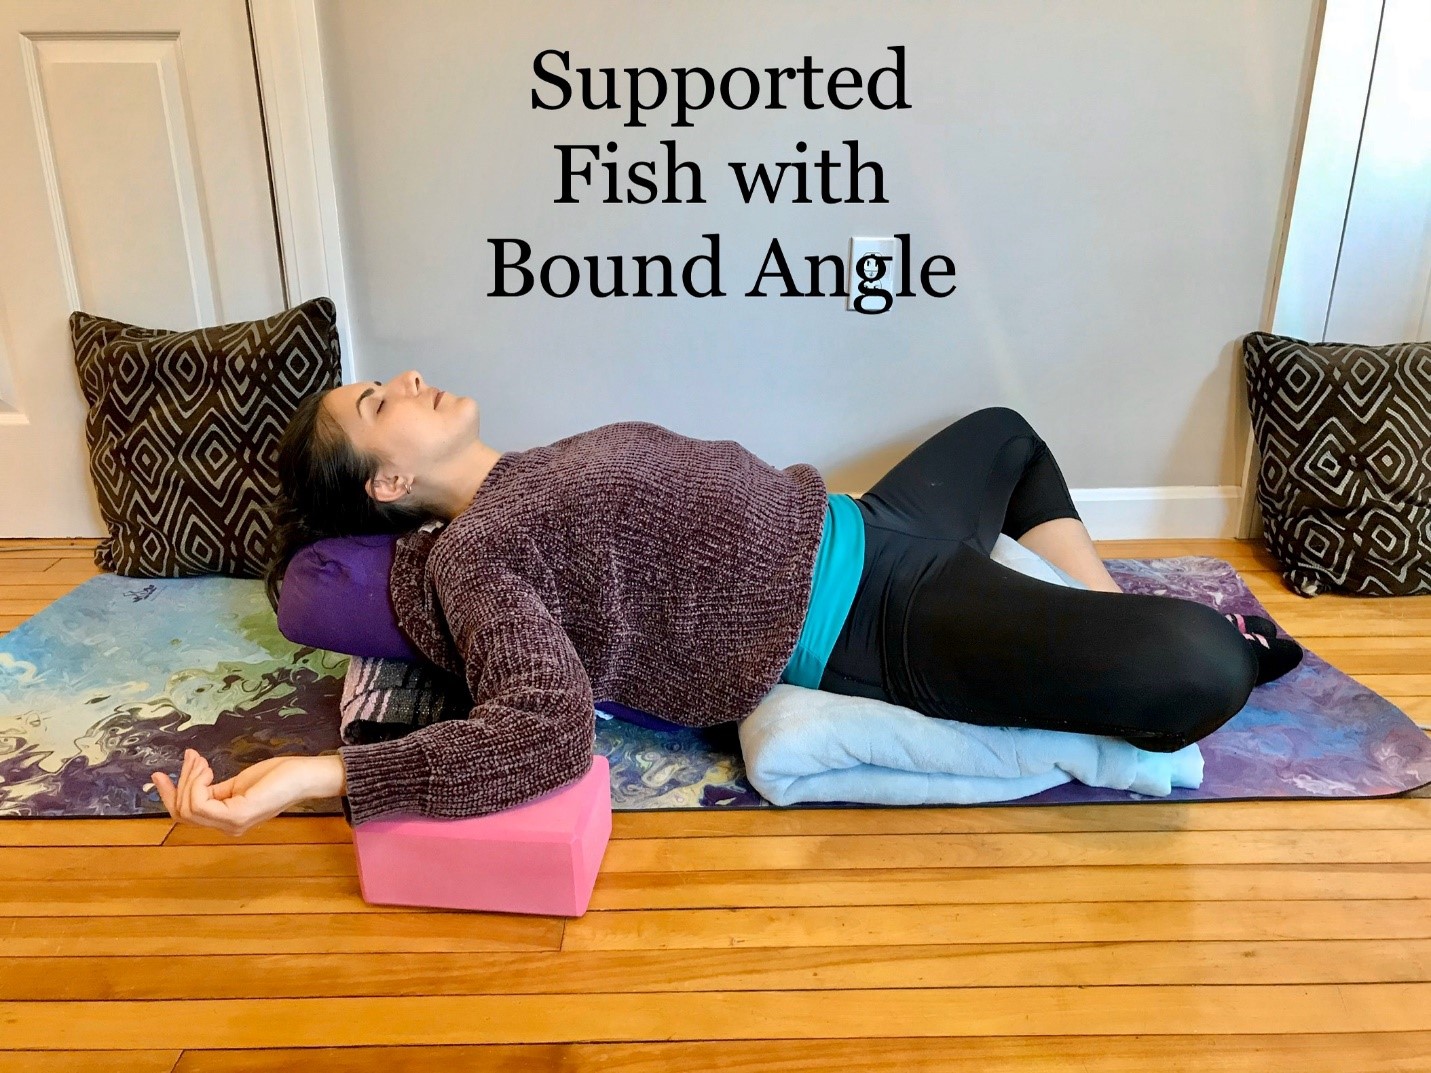
This pose is one of my favorites! It is very helpful to release tension caused by sitting at a computer as it opens your chest and your lower back. With the child’s pose set up for reference, this pose will start with a smaller and lower stack of slightly elevated pillows as your upper body support. Alternatively, for a larger opening of the chest, you can roll up a blanket or towel to create long but thin support that will rest just between your shoulder blades. Place a blanket at the bottom of your upper body support to raise your hips slightly above your ankles. Place a prop on either side of your upper body supports to rest your hands on if needed. With your back facing the upper body support, sit on the blanket, and snuggle your hips into the bottom of the support, place the soles of your feet together. Check-in with your body and see what feels the most comfortable regarding how close or far away your ankles are from your hips. Take a deep breath in and on your exhale sink back into your upper body support allowing your arms to fall to the side.
Supported Bridge with Legs on Chair
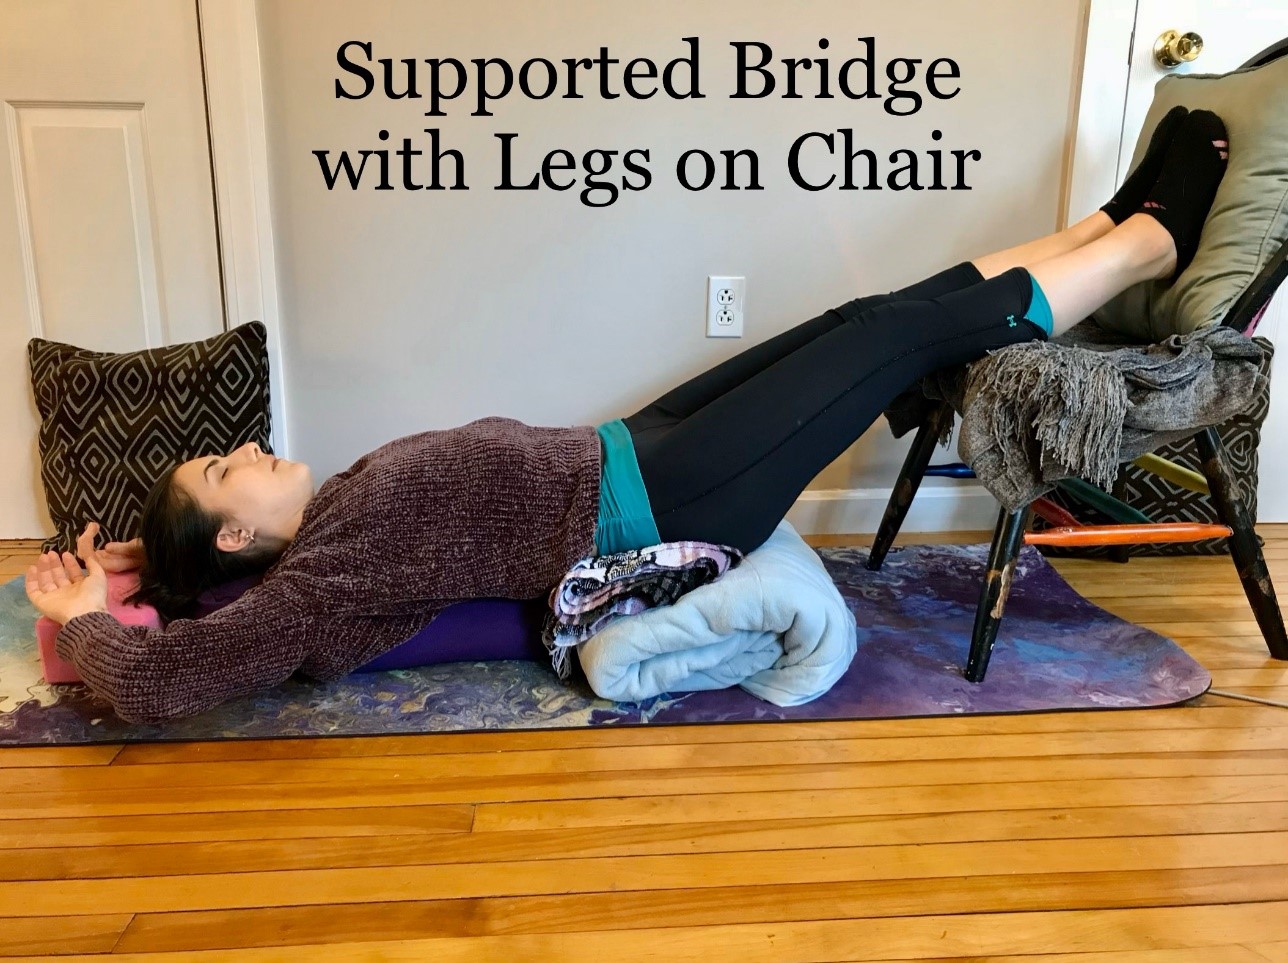
This is a combination of a few restorative poses that I feel really helps to relieve lower back stress as well as counteract tension from sitting at a computer. I typically use a chair for this pose however if you do not have a stable chair without wheels, you can place your legs up on a wall, a short table or you can use a stack of pillows/blankets. With the last prop set up as a reference, drop your upper body supports down so they are no longer elevated. Place a few blankets or pillows at the bottom edge of your upper body support to elevate your hips so they are in line or slightly above your chest. Set up your chair or leg support as needed. Sit on the elevated bottom supports, take a deep breath in, and on our exhale sink into your upper body supports. Your arms can rest above your head on a prop, as shown, or you can have your arms to the side as featured in the other poses. Lay your legs on the support you have available.
There are so many restorative poses that can target any part of the body that feels overly tight or aches. I highly recommend searching for other poses if these do not resonate with you. We hope that these few poses help to relax and restore you! Check out Operation Health@Home’s yoga Nidra meditation to support your restorative practice here: Mindfulness: Guided Yoga Nidra Meditation